May 23, 2025, 11:13:49 PM

Author Topic: Aeronautica Imperialis Battle Reports- A Series of Linked Games  (Read 5906 times)

Offline Easy e

  • Full Member
  • *
  • Posts: 263
Aeronautica Imperialis Battle Reports- A Series of Linked Games
« on: January 22, 2015, 11:09:31 PM »
Battle 1- Valley of Ruins

Under the employ of Mistress Merciveaux the Cabal of the World Walkers participated in her assault on an Ork-held world in Wilderspace.  Her spies indicated that the planet had once been the center of an ancient civilization that had powerful warpcrafters.  The Mistress intended to scout the ruins and locate any artifacts of value. 

Her flagship, The Scorned Lady; slipped into orbit over the planet.  The Orks below were relatively primitive and could not stop her warship.  However she did not wish to risk an orbital bombardment as she wished to capture the ancient civilization's artifacts intact.  Instead, her sorcerers located likely locations of warp power.  She then deployed scouting aircraft to sweep the area and report any warp signatures that were detected. 


Recon Sweep

Cabal of the World Walkers[/u]
1 Hell Driver Recon Plane- Hy'wok

1 Hell Blade- Ry'Zor

1 Hell Blade- Spar'Ow

Da' Skrapperz[/u]
1 Fighta- Grimtoof
 
1 Fighta- Drillsnik

1 Fighta- Bomma- Snikgit
-Rokkits

Set-up:
We rolled up 4 potential recon targets.  If you get a plane within one altitude and 6 inches you roll to see if they are worth doing further recon.  WE placed them in a somewhat straight line in the middle of a shallow valley that was angles slightly off the center line of the table. 

The Cabal entered the board high and fast to represent them coming out of Orbit and racing down towards the planet to complete their missions.  The Hell Diver was in the right, with the Hell Blades paired up next to it. 

The Ork defenders were at mid altitude and medium speed.  The Fighta-Bomma took the center, while a fighta took each flank.  The targets were ancient ruins situated in a valley between a series of altitude 1 and 2 rock outcroppings. 
 
Turn 1:
Initiative:  Orks 

Moving:  The chaos planes race forward trying to bleed off altitude so they can actually perform their mission, they don't even vector towards their targets yet.  The Orks look like they want this to be a low-level dogfight and drop down a bit and fly over the Valley of the Temples where most of the Recon targets are.   

Shooting: None

Turn 2
Initiative: Orks

Move: Fighta 1 wings-over to stay in the valley and drops down lower confident that he will be safe from the Chaos planes.  However, he underestimated their speed and agility as they power dive down and rocket towards him.  Hellblade 2 has an angle on him, but his wingman is still too high. 

Caught by surprise by their aggressiveness, the remaining Orks are out of position and broke hard to the left, expecting them to continue to move straight to slow down.  The Hell Driver dives low, but its lower speed means it is trailing her escorts considerably. 

Shooting: Hellblade 2 opens fire on Fighta 1, but his shots go high over their mark.  Consider it a warning shot!


Turn 3
Initiative: Chaos

Moving:  The Hell Driver takes a high-G turn towards to cross the Valley of the Ruins.  Fighta-Bomma 2 cunningly completes a wing-over to try and chase the recon plane down.  However, Hellblade 2 anticipated the move spiraled around to intercept.

Hellblade 1 went after the Fighta-Bomma, but a Half-loop took the Ork plane above his foe and almost made the hunter the hunted.   

Shooting:
Hellblade 2's auto-cannons stitched Ork Fighta 2, but failed to hit anything useful.  Instead, a bunch of bolt-on plates and debris fell away from the scrap plane.

The Hell Driver was just out of short range and an altitude level away.  However, a couple loose shells found their mark, but failed to do anything other than scratch-up the paint. 

Turn 4
Initiative: Orks

Move:
Fighta 1 and 2 turn to go over the Valley of the Ruins, but they overshoot the action and end up out of position.  The Hell Driver breaks hard right after skirting the Pyramids and the final temple in the valley.  Neither seem to have any warp signature to speak of. 

The Fighta-Bomma roars over the top of the valley walls and power dives in, its fuselage just cresting the top of the jagged rocks by inches.  Despite his impassioned flying, he comes up just out of position on the Chaos Recon plane.  The HellBlades circle back into the action, with the aggressive flying of Hallblade 2 letting him line-up another shot, this time on the Fighta-Bomma.  Can he make it stick this time?


Shooting:
Per the request of the Ork player, we take a closer look at the attack vector of the Fighta-Bomma, and it is judged to have an angle on the Hell driver after all! 


Despite the close range fusillade of  shots, none damage the Hell Driver.  Too bad he is too close for Rokits. 

Hellblade 2's firing tone solid, and he opens fire on the Fighta-Bomma, this time causing the Ork craft to blow smoke!  However, he only has one burst of ammo left.

Turn 5
Initiative: Orks   

Move: 
The Orks realized that they could not stop the Hell driver from scanning the last temple, so moved to try and stop it from circling back to the arch ruin by crossing back to the opposite side of the Valley.  The Hell Driver completed its can of the final temple and found nothing of interest and broke hard to begin circling back. 

Fighta 12 tried to shake the pursuing Hellblades and broke away fromt eh battle, but Hellblade 2 used his superior handling to easily follow him. 

Shooting:
Orks have no shots.  Oh no!

Hellblade 2 uses the last of his ammo, and causes Fighta 2 to blow smoke.  Tzeentch works in mysterious ways as Hellblade 2 is out of ammo.  Despite some excellent flying he will have to go home empty handed. 

Turn 6
Initiative: Orks

Move:
The Orks moved to try and intercept the Hell Driver, but the Chaos craft cut behind them and powered past their trap.  Meanwhile, Hellblade 1 cut in and got the interior line on Fighta 1 and the the Fighta-Bomma. 

Hellblade 2 raced away from the battle.  His controller gave him permission to break, and then return to the Scorned Lady in orbit. 


Shooting:
Orks have none!  Oh no!

Hellblade 1 opens fire on Fighta 1, but only manages to spark his shells across the fuselage. 

Turn 6
Initiative: Chaos

Move:
This time the Ork Fightas were able to swing in on the Hell Driver as it raced past the final ruins.  Again, no warp energy was detected, so the entire Valley of the Ruins had been a wild goose chase! 

Hellblade 2 was bale to move in behind Fighta 1, and hopefully he would be able to take him out before he could fire on the Recon plane. 

Shooting:
Hellblade 2 prayed to Tzeentch and opened fire.  His burst ripped the wing right off Fighta 1 and the plane plummeted into the Valley below taking its pilot with it.  Boom! 


Fighta 2 saw his wingman go down just as he fired on the Hell Driver.  Most of his shots went wide, but a few managed to harmlessly go through the tail fin. 

Turn 7
Initiative: Ork

Move:
The Hell Driver Half-Loop caused the Ork Fightas to break away to the head of the Valley.  However, it wasn't far enough as Hellblade 1 managed to cut across and come in perpendicular to the Fighta-Bomma. 


Shooting:
Oh No, the Orks have no shooting!

Hellblade 1 riddles the Ork aircraft, but again nothing seemed to stick.  Perhaps the smoke from the damage craft had thrown off the Hellblades firing. 

Turn 8
Initiative: Chaos

Move:
The Orks decided to call it a day and tried to disengage. Fighta 1 managed to while being pursued by the Hell Driver.  Hellblade 1 tried to chase the Fighta-Bomma but it dived away. 

Shooting:
The grot in the Fighta-Bomma ball turret opened fire on the Hellblade as a parting shot.  The Grot was lucky and the Hellblade disintegrated in mid-air and the pilot was killed. 


Turn 9- Disengagement Turn
Initiative: Chaos

Move:
Now the game was in doubt, and the Hell driver moved to try and intercept the Fighta-Bomma.  However, it wasn't enough and the Ork plane gleefully raced off the board.     

Shooting:
None

Conclusion
Grumble, grumble, grumble.  I won the game, but the victory was marred by a last minute lucky Grot shot.  I should have just let the filthy savages go, but I got greedy. 

Anyway, on VP,s it was a narrow victory, but Mistress Merciveaux had learned that eh Valley of Ruins was just that.  No valuable warp artifacts would be located there.  Perhaps elsewhere on the planet had yielded better results. 

As for the Hell Driver, it did its job just fine.  No complaints here.  As for the mission, I was disappointed that none of the targets of the Recon Sweep proved to be anything worth using the Glyphs of Scrying on.  So, it really was just an elaborate dogfight after all.  However, the mission objectives made sure it didn't just devolve into a straight up furball.
« Last Edit: March 09, 2015, 06:21:39 PM by Easy e »
Do you like Free Wargames?
http://bloodandspectacles.blogspot.com/

Offline Easy e

  • Full Member
  • *
  • Posts: 263
Re: Aeronautica Imperialis Battle Reports- A Series of Linked Games
« Reply #1 on: March 09, 2015, 06:22:25 PM »
Battle of the Hovels- Part 1- Air Defense Suppression

After initial reconnaissance flights of the planet were complete, Mistress Merciveaux knew where to pinpoint her attacks.  However, the Orks were now alerted to her presence and were digging in.  Any attempt to land on the planet's surface would be heavily contested. 

Therefore, early on the third day after her arrival, she launched a wave of fighters into the upper atmosphere.  As they raced towards planet, the Ork defenders were alerted and took to the skies.  However, they could not converge on a single point of defense, as their was no clear target.  At the last moment, the Chaos forces skimmed the lower atmosphere and springboarded back to their Mistresses' command ship. 

Not all of the Chaos forces peeled off.  Tactical strike forces of chaos planes moved to the sites with identified warpcraft signatures.  The Orks who had mobilized for a large scale offensive were mostly caught out of position as small spearheads raced to their targets below.  The first wave of the surprise attack was to swoop in and destroy any established Ork air defenses that could hinder the oncoming ground assault on identified sources of warp energy.   

One such site, designated as The Hovels; was situated amidst an Ork village.  A strike package from the Cabal of the World Walkers was assigned with clearing out the Greenskin vermin from the site. 


Air Defense Suppression

Cabal of the World Walkers[/u]

1 Hell Fury
+Weapon Load
16 points

1 Hell Fury
+Weapon Load
16 points

1 Herald Strike Fighter
+ Weapon Load
21 points

1 Hell Hammer
+ Weapon Load
14 points

1 Hell Hammer
+ Weapon Load
14 points

105 points

Da' Skrapperz[/u]

3 Flakwagons
24 points

1 Eavy Flak Kannon
10 points

1 Traktor Kannon
25 points

2 Grot Bomb Launchaz
10 points

Reserves:
1 Fighta
14 points

1 Fighta
14 points

1 Grot Buzza
8 points

1 Grot Buzza
8 points

Total= 113 Points

Set-up:
We set-up the Ork village in their half of the board about 2/3rds of the way down.  Their were several shacks and buildings that were set-up clustered around two temples and an Arch of ancient origins.  There was also a line of altitude 1 rocky cliffs crossing the board diagonally.


The Hovels looking to the East

Ork Ground Defenses were set-up around the village.  A Grot Launcher flanked each side of the village  and was covered by a Flakwagon.  The Heavy Flak Kannon was behind the village was also covered by a nearby Flakwagon.  The dreaded Traktor Kannon sat in a position to cover eastern side of The Hovels. 

To represent the surprise nature of the attack, all Ork aircraft were placed in reserves.  Any Ork Reserves would enter the board on the short board edge closest to The Hovels at any speed or altitude. 

The Chaos forces would enter on the opposite board edge at max speed and altitude 9 to represent them coming in hot from orbit.  They came in a line centered by the Herald, with a Hellfury and Hell Hammer on each wing respectively.     
 
Turn 1:
Initiative:  Chaos

Movement:
The Chaos forces power dive in from the upper atmosphere.  The Herald heads towards the west, while Hell Hammer 1 goes East.  The rest go straight.  Not great power dives, and most craft only drop 1 or two altitude and keep going at full speed. 

Shooting:
Everyone is out of range.

Turn 2:
Initiative: Chaos

Movement:
The Chaos attack continues to power dive into range.  They cover the distance to the Hovels very quickly, and better power dives put them into the range of the ground defenses.  However, the Cabal are still mostly too high and fast to attack properly. 

Shooting:
The Flakwagons on the rocky ridges to the East open fire on Hell Hammer 1.  They manage to bracket the craft and send it crashing down trailing smoke.  However, the Pilot manages to eject safely. 


Hell Hammer 1 is downed by the Grot Gunnerz

A Flakwagon on the West makes Hall Fury 1's approach a bit rough, but fails to damage the craft.  Distracted by the Flakwagon, Hell Fury 1 fails to see the Eavy Flak Shell smash through his canopy and kill him instantly.  Another Chaos planes goes down!


Grot Gunnerz strike again.  Hell Fury 1 is obliterated in a puff of smoke!   

A Grot Bomb launches from the Eastern Launcher and buzzes over the Hovels. 
 
Turn 3:
Ork Reserves fail to arrive, but so far it doesn't look like they need them!

Initiative: Chaos

Movement:
The remaining Chaos craft race over the Hovels, but poor flying puts them in bad positions.  The Grot Bomb tries its best to chase after them. 


The Cabal of the World Walkers buzzes over the Hovels at low altitude

Shooting:
Chaos has no shots! Oh no!  That's what I get for sending Dregs instead of Vend'igo to do the flying. 

The Eavy Flak Kannon fires on the Herald.  It looks like a clean hit, but the craft Viffs away at the last moment.  However, the Western Flak Wagon manages to snag the Herald and pepper it with shells.  The Chaos craft begins to blow smoke and incense. 

Grot Bomb 2 launches and easily catches the low flying Herald, but misses the plane.  Perhaps the little Grot was blinded by all the smoke? 

Turn 4:
An Ork Fighta and Grot Buzza race in from the South!

Initiative: Chaos

Movement:
The Chaos craft rush forward.  Hell Fury 2 realizes he won't get an attack angle on the Western Flakwagon and pulls up hard, racing above the wagonz firing range. 

The Herald also overshoots his target, and in return is swarmed by the Grot Bombz!  Grotz everywhere!

The Hell Hammer manages to try to Dive Bomb the Traktor Kannon, while the Fighta and Buzza try to move to prevent it. 

Shooting:
The Hell Hammer's bombs drop free from the specially designed bays.  As the plane rockets away, they saturate the area and the extra damage finishes off the Traktor Kannon and Grot Krew. 


The dreaded Traktor Kannon goes up without firing a shot.

Grot Bomb 2 misses the Herald again!  Grot Bomb 1 manages to detonate close to the smoking plane, but fails to cause damage with a roll of 1! 

Turn 5:
The remaining Ork reserves do not show up. 

Initiative: Chaos

Movement:
Hell Fury 1 cuts back and tries to line up a pass on the western Flakwagon.  Meanwhile, Fighta 1 lazily flies over and waves at the Krew on the Flakwagon below. 

The Hell Hammer and the Herald both seem to be interested in taking out the Eavy Flak Kannon and are in line on the tower mounted gun. 

Shooting:
The Herald goes Weapon's Hot with its Deathshead missiles.  A few seconds later, the Eavy Flak Kannon is nothing but a smoking ruin!   Take that Grotz! 


Vengeance!

The Western Flakwagon sees what the Hell Fury is up to and opens fire.  However, the shots go wide. 

Turn 6:
No new ork reserves.

Initiative: Orks!

Movement:
The Hell Fury overshoots the Flakwagon.  Worse, Fighta 1 does a perfect wing over to give him a shot at the Hell Fury.  However, for some unknown reason Hell Hammer 2 starts going straight down the Ork Fightas throat!

The Herald peels off and aims for the Eastern Flakwagon.  Buzza 1 is in a good position to intercept except for being too high.  However, the herald is doggedly pursued by Grot Bomb 2 with its last bit of fuel. 

Shooting:
Fighta 1 has to deal with the Hell Hammer in his face!   The Hell Hammer pilots ejects as the Ork plane slowly dismantles the Chaos fighta with accurate Big Shoota fire. 

The Herald uses its last Deathshead Missiles to take out the Eastern Flakwagon.  That's for shooting me up before!


Grotz in a Flakwagon get what is coming to them. 

Meanwhile, the Western Flakwagon methodically cuts down the Hell Fury that overshot it.  The pilot manages to eject safely as his plane streaks into the ground and explodes. 


The Valley of Death as Cabal of the World Walker planes fall from the sky as wreckage.

Finally, the Grot Bomb uses the last of its fuel and attacks the Herald.  The little Grot lines up and..... misses.  The Bomb drops from the sky like a brick. 

Turn 7:- Disengagement Turn
The remaining Or Reserves come in from the South.

Initiative: Orks

Movement:
The Herald slows down to try and strafe the Grot Launcha, but overshoots the target area.  In the meantime, Ork Fighta 1 and 2 race to catch the last Chaos craft.

Shooting:
Fighta 1 and 2 spray fire at the Herald but miss. 

Conclusion:
The pilot of the Herald finally realized how lucky he was and gunned it out of there to a nearby ground base.  Of the five aircraft in the flight he was the only one making it home, and his plane was smoking like a hot house fire. However, did they complete their mission? 

It was Air Defense Suppression and the game started with 7 Air defense installations.  The Chaos attack managed to take out 3.  Granted, they were the dreaded Traktor Kannon and a Eavy Flak Kannon, so some heavy hitters; but ultimately their mission would be deemed a failure.

Ork Win!   

How did the aircraft do overall? 

Herald- This guys did a good job at his role.  Fly low, fly relatively slow, and blow things up on the ground.  The Deathshead Missiles did their job nicely.  The added Hit was also very helpful for weathering the storm while coming in.  I made the Hell Hammers as extra Ground Sttack as I was out of missiles, I forgot that a Herald can be armed with more than just missiles.  Maybe next time I will addd a Herald or two instead. 

Hell Fury- I included these guys in the strike package to strafe and take on enemy aircraft.  They did neither and instead just died.  Bad flying with them on my part. 

Hell Hammer- Well, the first one didn't get a chance to do much.  The Dive Bombing worked as intended and obliterated the ground target when Hell Hammer 2 got a chance to use it.  Other than that, I again didn't really get to use them to their full potential. 

This game I was just not with it.  Bad piloting and choices on my part left my pilots in bad spots, and I could not get the angle for the ground attacks right at all.  Oh well, good thing the next battle at the Hovels will be a Bombing Mission.  Too bad they still have plenty of Ground Defenses to contest the Bombers. 
Do you like Free Wargames?
http://bloodandspectacles.blogspot.com/

Offline Easy e

  • Full Member
  • *
  • Posts: 263
Re: Aeronautica Imperialis Battle Reports- A Series of Linked Games
« Reply #2 on: March 09, 2015, 06:22:58 PM »
Battle of the Hovels - Part 2 - Bombing Raid

The initial attacks on Ork positions were only marginally successful.  Despite these set-backs, Mistress Merciveaux's forces were all ready in motion and phase II of the operation had begun.  Part of the initial attack had Forward Operations Bases established in the planet's vast, barren wastelands while Ork eyes were focused on the Air Defense attacks. 

From these Forward Bases, Hell Talon Bombers were quickly deployed to follow-up the initial raids.  The intent was for the Ork Ground Defenses to be in ruins so as not to stop the oncoming bombers.  However, the relative failure of these initial raids let the Orks know where the key targets of the Chaos attack were located.  With surprised no longer an asset, the Chaos forces would face stiff resistance. 

In a stand-up fight, Mistress Merciveaux's forces were heavily outnumbered on the ground.  The bombing raids were intended to help clear the area around the warptech sites and allow her ground troops to deal with minimal resistance.  Ork aircraft began to swarm in and defend the dropzones, so the bombers had to fight their way through. 


Bombing Raid

Cabal of the World Walkers[/u]

1 Hell Talon
+Weapon Load
28 points

1 Hell Talon
+Weapon Load
28 points

1 Hell Hammer
+ Weapon Load
14 points

1 Hell Hammer
+ Weapon Load
14 points

1 Hell Blade
14 Points

98 points

Da' Skrapperz[/u]

2 Flakwagons
16 Points

2 Grot Bomb Launchaz
10 Points

1 Fighta
14 points

1 Fighta
14 points

1 Fighta
14 points

1 Grot Buzza
8 points

1 Grot Buzza
8 points

1 Grot Buzza
8 Points

1 Dakka Jet
+Ace- Going Ballistic
19 Points

Total= 103 Points

Set-up:
This was a continuation of the Battle of the Hovels.  Therefore, we kept the Hovels and Ground Defenses set-up as the last game.  The Temples are invulnerable for this mission.  The goal is to eliminate as many of the smaller Ork buildings as possible, while the Orks will try to stop the destruction.  Bomb hits to the area of the Hovels is all that matters.     

The Chaos forces will enter on the North end of the board.  The Hell Talons were to the West side of the deployment zone at medium speed and medium altitude.  Next came the Hell Hammers and then the lone escort. 

On the South side were the Orks.  They were also mid-altitude and speed but closer to the center of the board.  The Dakkajet was in the center, and they were generally staggered Fighta, Buzza, Fighta, Buzza. 
 
Turn 1:
Initiative:  Orks

Movement:
The Chaos forces all took High-G turns towards the Eastern board edge and paralleled their deployment zone.  This confounded the Ork interceptors who just moved forward cautiously.  They began to cluster near the Hovels. 

Shooting:
None- No one was even close to being in range. 

Turn 2:
Initiative: Orks

Movement:

Chaos forces began to turn and move to attack along the Eastern board edge.  The Ork forces carefully turned to meet them, wary of the Chaos planes sudden speed and ability to turn.  They did not want to let the Cabal of the World Walkers get behind them. 

Shooting: 
None.  No one was in range yet.

Turn 3:
Initiative: Chaos

Movement:
The Chaos Bombers began setting up for their run at the targets moving from Northeast to Southwest.  Again, the Orks were cautious about over committing to the engagement. 

Meanwhile, the Ork Ace flew ahead as tempting bait to the lone Chaos Hell Blade.  The brash pilot was eager to take the bait and swooped in, gunning I engine.  However, it was a trap as Fighta 3 swung in to go head-to-head with the Hell Blade at close range! 

Shooting:
The Hall Blade pilot realized his mistake and prayed to Tzeentch.  He desperately opened fire at the oncoming Fighta knowing that if he missed, he would be dead.  His prayers were answered as his Auto-cannons dissected Fighta 3 along with its pilot.  First blood to Chaos!


Tzeentch be praised!

Turn 4:
Initiative: Chaos

Movement:
The Hell Talons begin their bombing runs by Power Diving.  They successfully dive behind and beyond the Ork lines.  The Ork Ace sweeps in from the side, and just misses the angle of attack.  He had been in the right position and anticipated correctly, but he was off by seconds. 


Begin your attack run now.

Meanwhile, the Grot Buzzaz and Fighta 2 try to gang up on Hell Hammer 1 while Hell Hammer 2 drops and kicks in his engines to blast by them. 

One of the Grot Bomb Launchaz sends up their Grot Bomb.  Brave little grot.  Good luck!

Shooting:
Seeing the end coming, Hell Hammer 2 opens fire on Grot Buzza 1.  His shots just sail over and through the little plane, but it continues undeterred. 

Grot Buzza 2 returns the favor, and his little shootas tear through the Hell Hammer at extremely close range.  The chaos plane explodes in a puff of sweet smelling incense and blue flame dragging the pilots soul to the Warp.  Scratch one bomber.       


Turn 5:
Initiative: Chaos

Movement:
The Hell Talons race over the Hovels.  Again, the Dakkajet can't seem to get behind them and into shooting range. 

Fighta and Buzza 2 try to chase after the Hell Hammer.  The rest try to circle back towards the Hovels. 

Shooting:
The Hell Talons unload their bombs on the Hovels and with Extra Damage do 8 hits.  Pretty good for Hell Talons!   


Special Delivery!

The Flakwagon to the West can barely reach Hell Talon 2 and opens fire.  The shots scratch up the paint and stop the crews victory celebrations, but fail to cause any real damage.   

The second Grot Bomb Launcha fires. 

Turn 6:
Initiative: Orks

Movement:
The Hell Hammer tries to set-up for its dive bombing run, but Fighta 2 and the DakkaJet are bracketing him and ready to fire.  The Hell Blade tries to get a shot in on Fighta 2, but can't get the right angle. 

The Hell Talons wing over/Half Loop to get ready to retrace their steps out of here and maybe do a bit of dog-fighting. 

Shooting:
The Dakkajet opens fire, but misses the Hell Hammer.  Fighta 2 follows up and sinks a few shots into the Chaos plane, but fails to hit anything vital. 

Turn 7:
Initiative: Chaos

Movement: 
The Hell Talons make a break to escape, and look like they are home free.  However, Buzza 2 swoops in to take a few shots at Hell Talon 2.  The last Hell Hammer Power Dives over the target area, ready to saturate the Hovels with more bombs. 

Meanwhile, the Ork defenders move about trying to catch any of the elusive Chaos aircraft.  Buzza 1 just misses getting into position on the Hell Hammer.  The Hell Blade manages to tuck into a tailing position on Fighta 2.

Shooting:
The Hell Hammer's bomb load manages to fall into the Hovels and cause two more points of damage!  Huzzah for precision dive bombing!


Bombs Away!

Grot Buzza 2 opens fire on the fleeing Hell Talons, but fails to hit home.  However, the grot was very satisfied with his spray of bullets.

The Hell Blade opens fire on a jinking Ork Fighta 2.  However, the Ork plane is out of luck, as the auto-cannon shells chew through the junk fighter, and hit its fuel tank.  The plane explodes into a sheet of flame and dives into the ground.  The Ork pilot failed to eject and rode the flaming bird in. 


Another kill.  Glory to Chaos!

The Western Flak Wagon on the ridge opens fire on the fleeing Hell Hammer, but fails to strike home. 

Grot Bomb 1 runs out of fuel and falls from the sky. 

Turn 8:
Initiative: Orks

Movement:
The Hell Talons manage to disengage off the board to the South, their bomb bays empty.  Hell Hammer 2 also decides to kick in the after burners and disengage, but off the Western edge.  The Buzzaz and Fighta 1 try to move and cut off the Hell Hammers escape, but they are too slow.

Hell Blade 1 power dives and tries to jet off the board tot eh West at maximum speed, but can't make it. 
The Dakkajet tries to pursue but can not get the angle. 

Shooting:
The Western Flakwagon takes a ranged parting shot at the Hell Blade.  The Grot Gunnerz make it interesting, but fail to find the soft spot in the chaos fighters hull.

Grot Bomb 2 falls from the sky as it runs out of fuel. 

Since the last Chaos craft will easily Disengage next turn, we decide to call it a game. 

Conclusion

Chaos wins!  We manages to hit the target area for 10 points of damage and took down 2 fightas!  In return we only lost a Hell Hammer that tried to get all cocky and tried to take on a Buzza. 

With the successful bombing run against the Hovels, it cleared the way for a Ground Assault.  Clearing the air defenses on the Eastern side of the Hovels in the last game gave me a good attack route.  In addition, I spent some time letting my attack form early on instead of simply lining up on target and kicking in the afterburners.  This allowed my attack to be less predictable and harder to stop.  My bizarre opening moves seemed to throw off my opponents flying for the rest of the game.   
 
The Hell Talons are not great bombers, but they managed to do the job today with Extra Damage.  The Hell Hammers also worked as advertised.  No complaints about either of them today. 

The Grot Bomb Launchaz on the ground are only a threat if the enemy has to come to the target.  Otherwise, the Grot Bombs inability to gain height takes away their effectiveness.
Do you like Free Wargames?
http://bloodandspectacles.blogspot.com/

Offline Gothmog Lord of Balrogs

  • Full Member
  • *
  • Posts: 613
  • Lord of the Seven
    • Sepulchre of Heroes
Re: Aeronautica Imperialis Battle Reports- A Series of Linked Games
« Reply #3 on: April 05, 2015, 01:48:55 AM »
Awesome.

I regret never getting more of this and ultimately how little I have of it. I don't get why FW had to discontinue it.
"Give me a thousand men crazy enough to conquer Hell and we shall do it!"
www.sepulchreofheroes.blogspot.com
sepulchreofheroes@gmail.com

Offline Easy e

  • Full Member
  • *
  • Posts: 263
Re: Aeronautica Imperialis Battle Reports- A Series of Linked Games
« Reply #4 on: April 14, 2015, 06:44:03 PM »
I have a sneaking suspicion that GW's decision to put flyers in normal 40K is what killed AI.  The samething that probably killed FW's Epic line as well.  FW can't do a line of things that GW is doing too.   

That's in addition tot he general killing of Specialist Games in general across the GW spectrum. 

Hopefully I will get to play the final ground assault for this series of linked game ssoon.  Been bust. 
Do you like Free Wargames?
http://bloodandspectacles.blogspot.com/

Offline Easy e

  • Full Member
  • *
  • Posts: 263
Re: Aeronautica Imperialis Battle Reports- A Series of Linked Games
« Reply #5 on: May 19, 2015, 07:44:30 PM »
After the success of the Bombing Runs on their intended targets, Mistress Merciveaux was confident that the ranks of the Ork ground forces had been thinned.  Thus, her third attack wave commenced.  It was time for a ground assault.  The assault would be a low-orbit Drop using Icon Dropships to deliver her best troops.  Her more expendable mutants and foot soldiers would descend in Vandal transports.  These would be accompanied by fighter escorts for protection. Hopefully, the dual prongs of the attack would keep the Ork defenders at bay. 


Battle of the Hovels- Part 3- Ground Assault

Cabal of the World Walkers[/u]

1 Icon Dropship- Represented by my Tormentor
15 Points

3 Vandal Transports
15 points

1 Hell Driver Command Ship
+Additional weapon load
30 points

2 Hell Blades
24 points

84 points

Da' Skrapperz[/u]

2 Flakwagons
16 Points

2 Grot Bomb Launchaz
10 Points

3 Fighta
 42 points

3 Grot Buzza
24 points

1 Dakka Jet
+Ace- Going Ballistic
19 Points

Total= 111 Points

Set-up:
This was a continuation of the Battle of the Hovels.  Therefore, we kept the Hovels and Ground Defenses set-up as the last game.  The Temples are invulnerable for this mission.  The goal is to land as many troops as possible in the Hovels. Each troop unit successfully landed will provide a +1 modifier to determine if Mistress Merciveaux's forces have successfully retrieved the artifact.  At the end of the game, roll a d6 and add the number of troops successfully landed.  If the result is 7 or better than the warp artifacts have been recovered by the ground troops.         

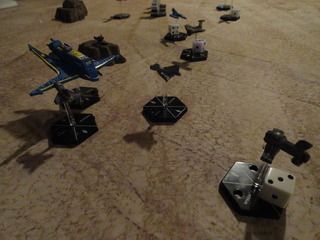
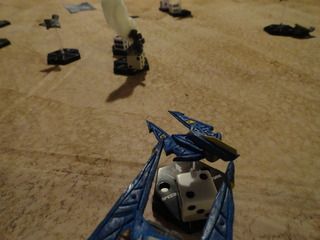
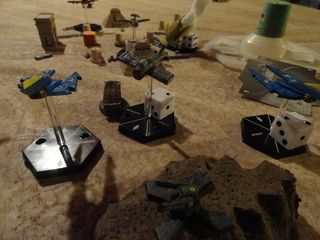
Chaos forces had the Vandals and fighters coming in from high altitude towards the weak side of the Ork Defenses.  The Icon was coming in on the opposite side.  The Grot Buzzaz and a fighta were opposite the Icon, and the Dakkajet and the other fighta were opposite the main attack.  They were at mid-speed and range.  The seemed to plan on intercepting the Chaos forces in the middle altitude bands. 
 
Turn 1:
Initiative:  Chaos

Movement:
The Chaos forces all power dived from high orbit towards the target area.  The Hell Driver and Hell Blade 1 move to escort the Icon, while Hell Blade 2 and the Vandals go the opposite way.  The Orks moved forward to meet them all at mid-altitudes.   

Shooting:
None- No one was even close to being in range. 

Turn 2:
Initiative: Orks

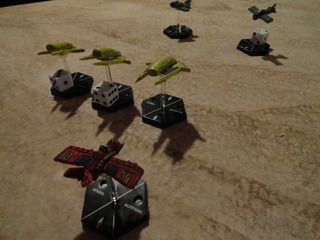
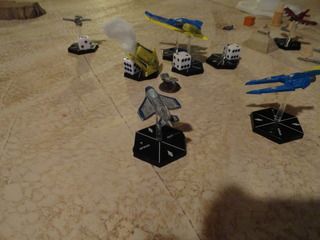
The Icon keeps moving to get over the target area, but is going to go head-to-head with a swarm of Grot Buzzers.  The Hell driver and the Hell Blade come in from the flank, but Fighta 3 does the same.  There is going to be a lot of shooting soon. 

The Vandals dive towards the side, but it isn't enough as the Ork fightas move in for the kill.  The Ace uses his Ace abilities to swing around behind the Vandals, but he is far too high!


Shooting:
Fighta 3 opens up ont eh Icon, just out of short range.  However, his Big Shootas find their mark and reduce the dropship by 1 hit, only 2 left!

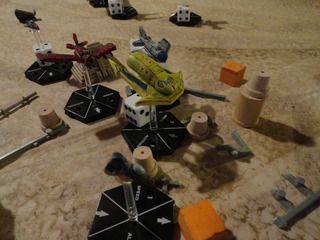
The Hell Driver opens fire with his Auto-cannons, and takes Grot Buzza 2 down with a puff of smoke.     

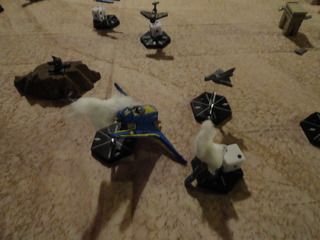
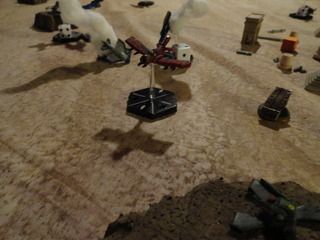
Grot Buzza 3 and the Icon trade shots, but fail to hit anything.  However, Grot Buzza 1 fires his little blastas right through the windshield of the Icon, killing the command crew and sendign the Dropship tumbling from the sky in an uncontrolled spin.  Drop troopers are thrown roughly from the ship just before it crashes into the dessert sands below.  However, there are few survivors.  Scratch 1 transport!


Hell Blade 2 gets the drop on Fighta 3, and causes him to start to blow smoke from a barrage of auto-cannons shots.  Not enough to drop the ork craft.

Fighta 1 misses his Vandal target, but Fighta 2's aim is true.  He splashes his target with a burt of Big Shoota fire.  Another transport goes down. 


Turn 3:
Initiative: Orks

Movement:
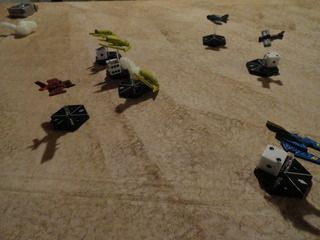
The Chaos fighters move to the edge of the Hovels and try to get in a position to support the approaching Vandals.  Only Hell Blade 2 is in a good position, as a bit of a traffic jam occurs.  Meanwhile, the Vandals keep dropping to the hard deck and heading out wide.  It is unclear if they will be able to circle back to the Hovels to land. 

Manwhile, the Ork Fightas and Grot Buzzaz converge on where the drop ships are, but they are a bit too high to get good shots. 

Shooting:
Both Grot Bombz launch from their ground stations. 

Hell Blade 2 takes a pop-shot at Grot Buzza 3 and blasts the little plane from the sky.  The Grot didn't even see it coming!     

The Ork Flakwagons fire on Hell Blade 1, but both miss. 


Turn 4:
Initiative: Orks

Movement:
The Ork fightas were going pretty fast, so struggled to slow down and get the right angle on the slowing Vandals.  Meanwhile, the Chaos fighters raced in to cover the approach. 

Shooting:
Fighta 1 was coming in low along the hard deck, and lined up on the trailing Vandal.  His shots rip through the Chaos craft and cause it to slowly lose power.  The pilot and some of the passengers manage to bail-out, but most are carried into the ground and killed in the ensuing fireball.  Only 1 Vandal left! 


The Hell Driver snaps a psychic image of Fighta 3 (+1 VP  :) ), before firing its auto-cannons.  The shots all fly wide of the mark. 

Grot Bomb 2 lines up on the last Vandal, and surges forward.  However, he is only a Grot and completely misses his target! 

Hell Blade 1 opens fire on Fighta 1, trying to get revenge for the downed Vandal.  He peppers the Ork craft and causes him to start to blow smoke.  Not enough for a clean kill. 

The Ace in the Dakkajets opens fire on the Vandal and manages to spark some shells off the transport plane's hull, but can't find the weak spot.  The height difference probably kept the Chaos plane alive!   

Turn 5:
Initiative: Chaos

Movement:
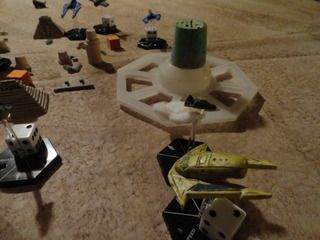
The Vandal come sin low over the Hovels, and the troops get ready to disembark, except they are still too high to land.  The Ork Ace, Fighta 1, and a Grot Bomb all converge on him. 


Meanwhile, the Chaos fightas are out of position to protect the lonely transport.  Things do not look good. 

Shooting:
The Hell Driver takes a pop-shot at Grot Buzza 1, but fails to cause any real damage. 

The Ace in the Dakkajet opens fire first.  Despite the spray of bullets, nothing sticks tot eh transport, and it flies on.   

Hell Blade 1 fires on the same Grot Buzza who is trailing the battle,and takes him down.  The little guy goes down with his Buzza.

The damaged Fighta 1 opens fire at close range on the Vandal, but he too misses most of his shots!  It is no time to get cocky, as Grot Bomb 1 tries to collide with the Vandal, but misses his chance!  17 shots, 2 hits, and no damage!  Now is it time to get cocky? 

No, because a measurement finds that one of the Flakwagons can take a shot at the Vandal too!  Two hits!  The damage roll comes up and.... nothing!  Okay, NOWcan I get cocky?  My opponent informs me not to get cocky until he lands successfully.  Duly noted!

Turn 6:
Initiative: Chaos

Movement:
The Chaos fighters swoop back in over the Hovels.  The Orks try to get around in front of the Vandal, but the transport surprisingly does a half loop.  It manages to reduce its speed, but it is still too high.

Grot Bomb 1 is on a collision course!

Shooting:
Hell Blade 1 sees the danger to the transport and fires with his auto-cannons.  He blows the little Grot Bomb right out of the sky with some fancy shooting!


The Ork Ace fires on the Hell driver, but barely even causes it to jink.   
   
An Ork Flakwagon fires a burst of tracers into the air at the Vandal, and the bullets shoot straight through the crafts weak superstructure and cause no serious damage. 

Grot Bomb 2 falls from the sky!  The Ork pilots laugh. 

Turn 7:
Initiative: Orks

Movement:
The Vandal side slips and drops to altitude 1.  Next turn it should be able to land, but will it hit the Hovels? 
The Ork Ace and Fighta 3 try to bracket the Chaos craft, but don;t seem to get the angle.  Meanwhile, the Chaos fighters move to cover the landing. 

Shooting:
Fighta 1 opens fire on Hell Blade 1 at close range, and sinks 4 shots into the target.  However, the Chaos plane miraculously survives the barrage and flies on.  A number of big shoota holes decorating its hull. 

Hell Blade 1 was too busy soiling himself, and missed his shots at the Ork Ace. 

A Flakwagon takes some pot shots at the Hell Driver, but misses.  Good thing they have unlimited ammo!  The other Flakwagon opens up on the Vandal again, and this times its luck runs out.  The tracers damage the engine, and the pilot manages to bail-out just before the transport crashes in amongst the Hovels.   


With that, the last transport goes down in flames, and it is time to disengage!

Turn 8:  Disengagement Turn
Initiative: Chaos 

Movement:
Hell Blade 1 and 2 go after Fighta 2 and 1 while they attempt to break off.  Fighta 1 is happy to oblige and goes head-to-head with Hell Blade 2.

The other craft break-off and head for home. 

Shooting:
Hell Blade 2 opens fire on the smoking Fighta 1, and blows him from the sky.  The pilot goes down with his bird. 

However, the Flakwagon the downed the Vandal gets revenge, and takes out Hell Blade 2.  The Chaos pilot managed to eject before his plane disintegrated around him. 

Hell Blade 1 managed to damage Fighta 2 as they passed.  However, it wasn't enough to down the plane.  The nearby Flak wagon opened fire, but despite the heavy barrage of shells, none struck home on the chaos plane.


With that, the game ended as everyone disengaged. 

Conclusion
Ork win, since it wasn't much of a ground assault.  Chaos boots never even touched the ground. 

I would love to tell you how the Icon Dropship performed, but it was smoked so fast I can't!  Over all, a fun game, even though it was looking pretty grim by the end of Turn 2 for the Chaos forces.  Chances are even if my lone Vandal did manage to land, it wouldn't have been enough troops to storm the Hovels.  The failure of the ground attack craft to suppress the Ork air defenses ended up costing us two aircraft this game. 

Now Mistress Merciveaux is going to have to try and take the ruins in a more traditional type of battle.  First step, get boots planetside, and then slog across the wasteland the hard way! 

Hunt for the Artifacts Campaign:
Valley of Ruin- Chaos victory- 1 point
Air Defense Suppression- Draw- 0 points
Bombing Raid on the Hovels- Chaos Victory-1 Point
Ground Assault on the Hovels- Ork Victory- 1 Point

Chaos 2 and Orks 1 point.
Do you like Free Wargames?
http://bloodandspectacles.blogspot.com/