The Dauntlesses don't have much choice in the matter. The attached shows possible moves and counter moves for the Retribution and Dauntless.
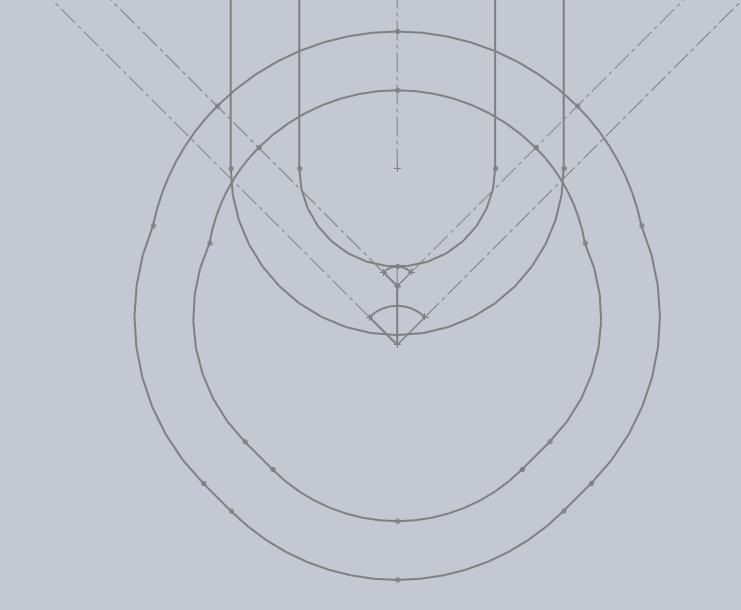
At the top of the image is a dashed line of starting locations for the Dauntlesses, beginning no closer than 45cm to the Retribution, and going as far away as is interesting. Around this line is a solid line denoting a 25cm move in any direction, and another line denoting a 42.5cm typical AAF move in any direction. An extremely good roll will be twice this distance.
In the middle is a plot of possible moves for the Retribution. Surrounding this are two squiqqly circles which denote where the retribution can bring its 60cm and 45cm guns to bear. The diagonal dashed lines show where the Retribution can point its prow (the lowermost diagonals require CTNH, and also shows where the side arc starts before the Retribution Moves).
So given that the goal is to get a shot off at the let's go through the options:
A: The Dauntlesses move to remain outside weapons range of the Retribution. Even with a very good AAF roll the Retribution can easily turn to totally negate their move.
B: The Dauntlesses move to 45-60cm of the Retribution. Without AAF, the Retribution can easily turn to negate their move. With a good AAF roll, they can just about exceed the Retribution's turn rate, even on CTNH. However, due to the random extra distance, they are at risk of not rolling far enough and ending up either at the mercy of the Retribution's guns or severely out of position. Either way, they'll not end up facing the right way to fire a salvo, and when they're forced to course correct next turn the Retribution will be able to recoup the angle they gained this turn. As we'll see later, slightly past directly in front of the Retribution won't be enough.
C: They move to within 45cm of where the Retribution will be. They can exceed the Retribution's turn rate, but so what? They still can't get a shot off at the side/rear and they're totally at the mercy of the Retribution's guns.
So where do they need to start to get off a side/rear view?
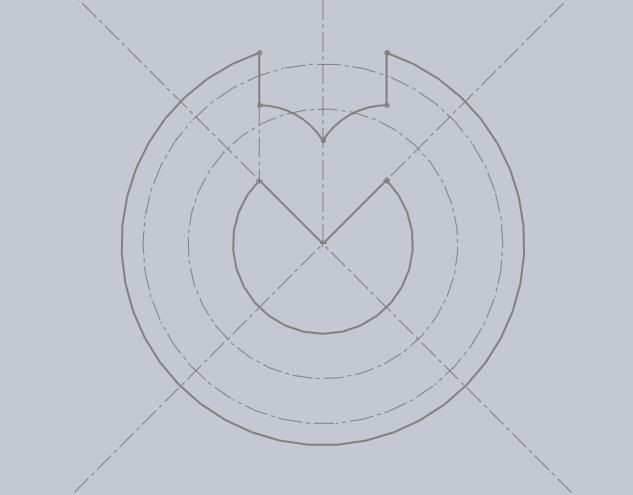
The outer solid line is where they need to be to get a shot off. The inner solid line is where they need to end up to get a shot off. The dashed circles are the Retribution's weapon ranges, whilst the dashed lines show the borders of the aspects. 2 options:
A: For most of the outer solid circle, they need to get a reasonable AAF and be pointing nearly directly at the Retribution. This doesn't work from directly in front, so they need a significant offset. As shown earlier, getting both an offset and facing the right direction is impossible on clear terrain.
B: For starting right in front of the Retribution, they either need to be within 45cm (in which case the Retribution will already have turned and broadsided them), or have a slight offest and be pointing in exactly the right direction. As noted earlier, getting an offest and pointing in right direction is pretty much impossible on open terrain.
So the best option for the Dauntlesses to flank? Split up. However, this leads to significantly increased attrition of the torpedo salvoes, and if the Retribution ever gets to fire both broadsides the battle will be over pretty much instantly.
