May 06, 2025, 08:05:55 AM

Author Topic: [BFG] Armiger84's Drydock  (Read 21066 times)

Offline Armiger84

  • Active Member
  • *
  • Posts: 131
    • Loc: Boston, MA
    • De Bellis Futuris
[BFG] Armiger84's Drydock
« on: April 22, 2013, 02:46:27 AM »
Hi folks, long-time lurker here (and I mean long-time), but I'm starting to get back into modelling again finally, and as Battlefleet Gothic's been my longest, strongest love among GW's games, that's where I'm starting in dusting off my collection and making some headway on my backlog of projects.

To start with, I absolutely loved "The Book of Nemesis" when I finally discovered it (a few years after it came out), and really liked the idea of adding some light cruisers to my chaos fleet... but the Blasphemer-class battleship really had my eye.  I liked the idea of the fast battleship from the first time I came across the Invincible-class BB in a GW article (which may be one of the next things I work on), it was just nice to see the chaos fleet get something new with all the love lavished on new cruisers for the Imperials by the community.

At any rate, I didn't find "Nemesis" until I was in college, and by then the high school gaming group I played so much BFG with (we played probably two or three games of BFG for every one of 3rd Edition 40K, I swear), and I had neither the supplies nor the confidence in my scratchbuilding skills at the time to undertake the construction of such a ship.

Well, it's been (more than a) few years since college, and my painting and building skills have improved since then... and with some time on my hands finally after the past few years, I'm getting back into the hobby again.

So, by way of introduction to the Specialist Games forum, I present my first serious attempt at scratchbuilding a Blasphemer BB.
My modelling blog:  http://armiger84.blogspot.com

Offline Armiger84

  • Active Member
  • *
  • Posts: 131
    • Loc: Boston, MA
    • De Bellis Futuris
Re: [BFG] Armiger84's Drydock
« Reply #1 on: April 22, 2013, 03:17:00 AM »
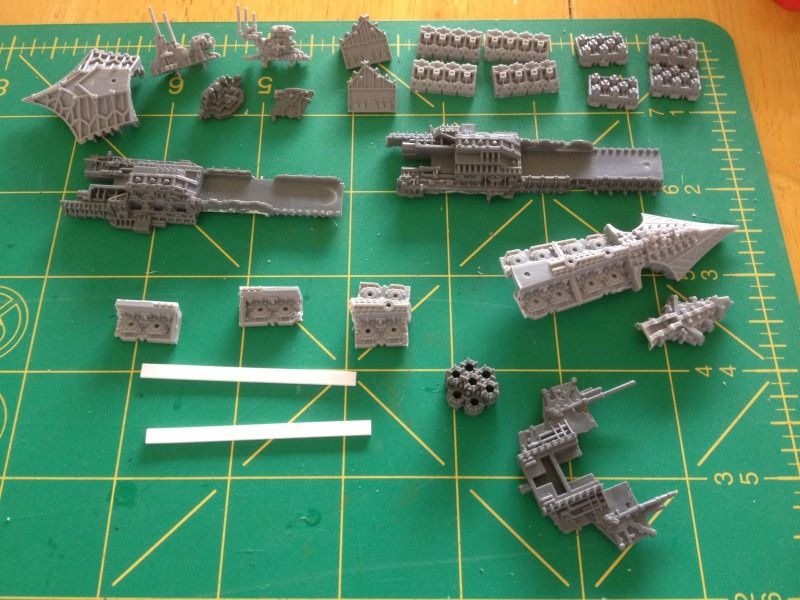
So I'm going off of the image provided in the Nemesis entry, and knowing that I'm going to be sinking a lot of trial and error into this, I've committed two imperial and two chaos cruiser sprues to this project.  This is what I started with:


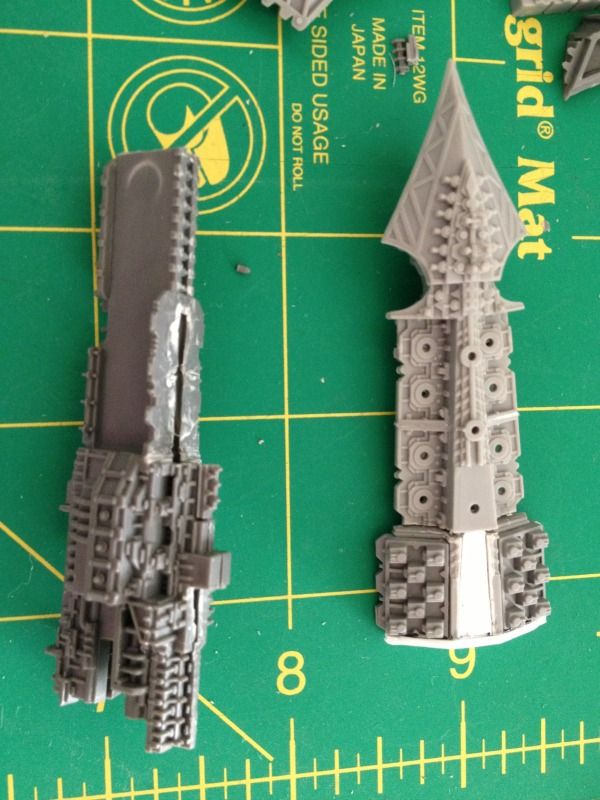
First observation:  I lopped off the lower chaos cruiser hull way too close to the prow, which brought the second cruiser sprue into play within minutes of starting the project.  I also went back over that imperial hull a few times to trim more detail off, as will become apparent in other pictures.


After sectioning up the first chaos hull, I trimmed everything flush on the underside; it's going to be floating over the engines and reactors section of the imperial cruiser later.  What this picture doesn't yet show (you'll see later) is that I also opted to widen the two chaos engine vents to fit two single imperial engine nacelles where they were located (taken from the top two sections of the imperial engine cluster once I realized they were going to be buried under the chaos hull section).


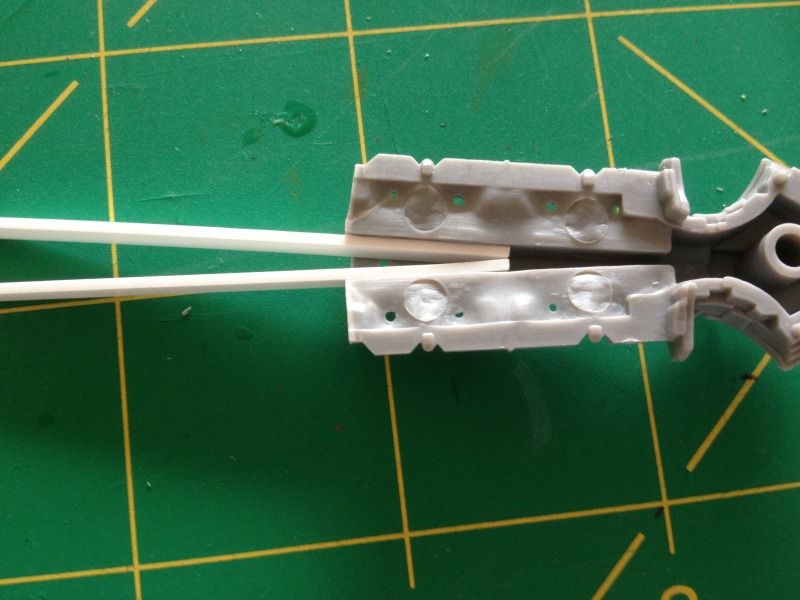
The next quick realization was that, well, I needed to lengthen the dorsal chaos cruiser hull.  My solution was to add a pair of supports along the inside to keep the hull's angles perfect.  Then I completely destroyed the ventral hull of one chaos cruiser kit to get myself 4 more individual upper hull sections, two of which I then attached to my framework.  I used a ruler to level them relative to the forward hull section, and made sure they lined up properly.  Wasn't as hard as it sounds, and the plasticard strips gave me the perfect base to later attach a trapezoidal section of card to to brace and reinforce the whole frame.


This is what I ended up with, a partially-finished dorsal hull for the BB.  I mounted the aft pair of gun decks so I could better true up the later sections (more on this in a bit).


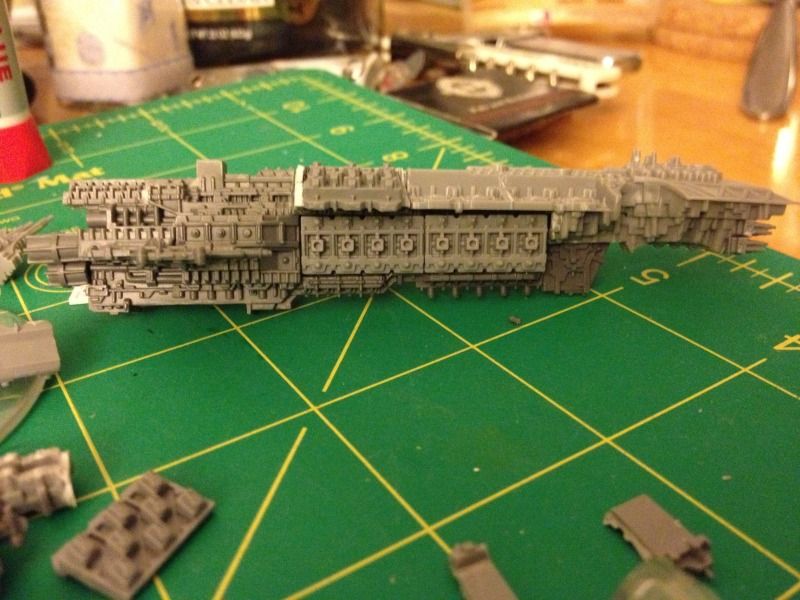
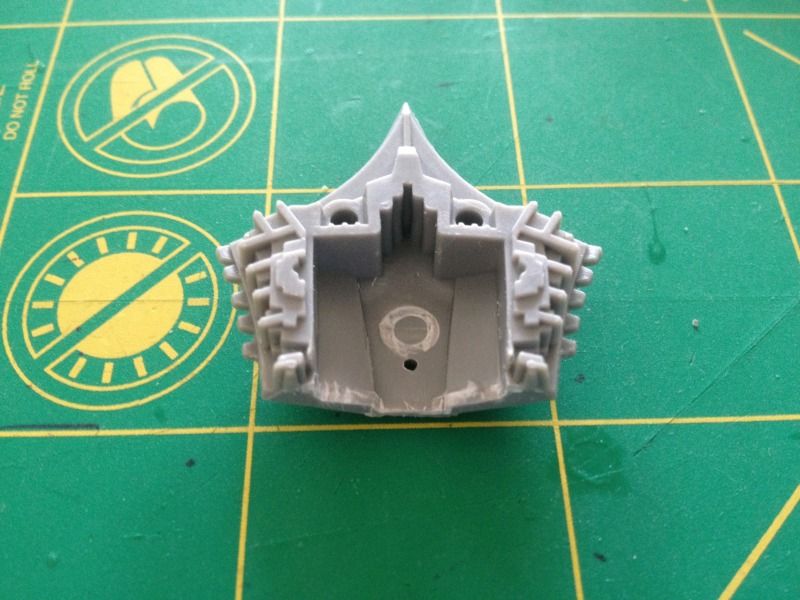
Here's where I am now.  I trimmed down the lower prow to mount a pair of chaos cruiser lance turrets under the prow armor to represent the 4 L/F/R lances.  I usually take off the upper prow guns and mount a single lance turret beneath for my Murder & Hades cruisers, but for this I'm leaving the little guns on, in the style of most chaos GCs and BBs which feel like they have way too many guns modeled on for their actual firepower output ;)
I brought the prow down to the ventral gun decks by using the imperial ventral fin.  It's wider than you think, and plugs in just fine there actually.  I'll need to bulk it just slightly with plasticard though, as the gun decks end a little too abruptly for my taste and need to taper slightly more on the prow.  I also need to design four spacers to fit between the dorsal gun batteries ([stern][guns][spacer][guns][spacer][prow]), and I plan on decorating at least one pair with chaos symbols or legion markings.  I need to build a lot more detail onto the dorsal spine, although I have the primary and secondary bridges ready to go, and I need to build up the ventral fin to match the book image too.  I'm not going to bother trying to lop more off of a second imperial cruiser kit to put on there; I have enough styrene in various sizes and shapes from Plastruct that I shouldn't have any trouble making it nice and gribbly.  I also want to try my hand at adding more engine nacelles onto the stern.  7 vents don't really feel like enough for a BB that can move 30cm in a turn under cruising power.  I also have some gap-filling to do, and some extra detail to add, but I'm going to save the greenstuffing work for tomorrow probably, it's late enough and I still have to clean up around here.

My big design debate right now centers on how I'm going to connect the dorsal hull to the stern around the bridge area.  I made a point of keeping the chaos cruiser sections level with each other across the hull, rather than dropping the rear section a little lower like the Nemesis image appears to show it.  This'll allow me to wrap the upper deck all the way around to the stern if I want to.  The original image just shows armor plating, but I'm not sure I want to go that route.  I'm considering adding a pair of chaos hangar bay sections for a few reasons.  First of all, they'll give me visual launching decks for planetary assaults (the rules don't have hangars, but I feel like if this is going to be a chaos marine ship like I want it to be, it needs to have embarkation decks. Just figure they have so few stormbirds and thunderhawks left that they don't dare risk them in void war and save them only for planetary assault).  Also, they'll thicken out the ship around the bridge, and without them it's beginning to feel a little wasp-waisted, which doesn't look right.  Along with that, I have a problem in that my dorsal gun decks are now much wider than the section of the chaos cruiser they need to meet flush with, and test-fitting chaos hangars has demonstrated a good trompe l'oeil effect, helping me actually narrow the dorsal hull back down enough to meet the stern safely without appearing to narrow it.

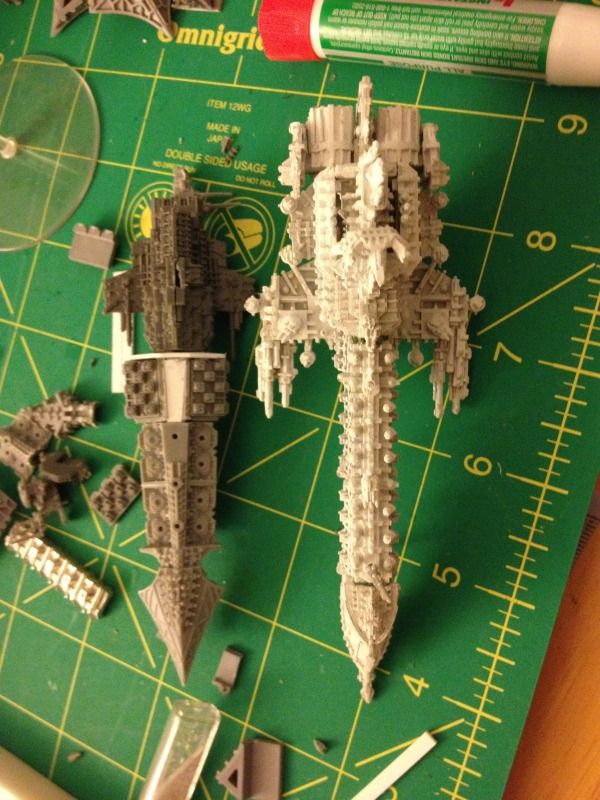
As a final pic, here's the hull so far alongside a Retribution-class BB for size comparison.  I think my design is big enough to feel like a BB, but sleek enough to believably be an 8-hit BB with a propensity to erupt in flaming self-destruction.


P.S. This is my first post, and my first time really messing with Photobucket for that matter.  I realize my pics might be massively oversized, and there's a ton of them since I made a lot of progress today.  If I need to shrink things down or swap out my links, please let me know and I'll get on that immediately.
« Last Edit: April 22, 2013, 03:18:45 AM by Armiger84 »
My modelling blog:  http://armiger84.blogspot.com

Offline AndrewChristlieb

  • Full Member
  • *
  • Posts: 1651
Re: [BFG] Armiger84's Drydock
« Reply #2 on: April 22, 2013, 04:04:20 AM »
Pretty sweet, the connection between the Imperial hull and the Chaos extension there looks like it could use some bulking out but it sounds like youve got that firmly in hand.
I don't make the rules, I just think them up and write them down.

Offline horizon

  • Mod
  • Veteran member
  • *
  • Posts: 4201
  • Destiny Infinity Eternity
Re: [BFG] Armiger84's Drydock
« Reply #3 on: April 22, 2013, 04:30:11 AM »
Good post!
If you keep that pace you might be ready in time to enter GothiComp 2013.

Offline afterimagedan

  • Full Member
  • *
  • Posts: 1902
    • Loc: Chicago IL, USA
Re: [BFG] Armiger84's Drydock
« Reply #4 on: April 22, 2013, 05:03:34 AM »
Sweet! Please make a little guide out of this.

Offline Armiger84

  • Active Member
  • *
  • Posts: 131
    • Loc: Boston, MA
    • De Bellis Futuris
Re: [BFG] Armiger84's Drydock
« Reply #5 on: April 23, 2013, 05:08:44 AM »
@AndrewChristlieb:
You'll get a chance to see my solution to the problem in a moment.  It's been most of my work on this ship for the evening.

@Horizon:
That was sort of the plan, believe it or not...  ;)

@afterimagedan:
I'll probably go back over my original post a little later and see if I can turn my stream of consciousness explanation into more of a step-by-step of how I got there.  It'll be interesting, most of that was trial and error and experimentation.

Speaking of trial and error and experimentation...

I managed to get a little greenstuff applied before I headed off to work this morning.  Thankfully nothing moved so things had set pretty well by the time I got home.  I need to go back over with some sandpaper later to finish smoothing things, but, well, you'll see where I am now.  One step forward, two steps back.  I found a solution to my aft hull, but I had to snap off the dorsal decking and move things around.  I also had to do a lot of cutting.  Here's what the superstructure looks like now with yet more detail removed to fit the upper hull sections:


Pretty much anything that might possibly get in the way of armor plating or styrene sheeting has come off around the nub where the imperial bridge attaches.  To go along with that, here's the underside of the aft armor plating.  I'm now glad I sacrificed two chaos cruiser kits for this.  I completely sectioned the second aft chaos hull to take the curved side pieces off, and I inverted them and linked them to the stern with a pair of hangar bays.  With enough sweeping curves, I can hide the way I'm pinching and then expanding the plating without it looking too bad, and without me having to completely scratchbuild the entire aft armor (which, if this doesn't work out, is an option, but... yeah).


The two big things to pay attention to here is how much of the side armor I had to cut away from those armor panels.  I basically stripped out everything all the way to the detailwork (it was a lot of hacking on the inside of those panels) so that they'll fit over the bulge where the imperial cruiser widens out.  I also dropped the stern a little lower to fill in the gap between it and the engine cluster, and I put those two buried engine nacelles where the chaos cruiser engine vents were located.  I had to widen the engine vents slightly but it went pretty quickly.

Here's two shots of where we are now.  Nothing on the top deck's glued down yet, mostly because I've tried fitting it a few times and I really need to get the front portion with the gun decks solidly bonded before I try to attach the aft portion to it.  I took out my plasticard spacer at the back of the gun decks because it was superfluous and actually pushed things out of position.  Without it, I can true up the rear armor straight to the gun decks, which has me happy.  I've got the bridge pieces in their partially-finished state floating over it so you can get a feel of what the final product will look like.


I realize that even with the design changes I made, the transition from the gun decks to the aft armor plating still isn't perfect, and it feels kinda jagged.  I like the idea, but not as obvious as it currently is.  I'm considering ways to mask that with antennae coming off the sides, although I'll have to fit them around the hangars for that matter.  What I have now is a long, wicked dagger, and that's a lot of what I'm looking for.

Tonight I'm going to glue down the front section (thank the False Emperor I didn't use plastic cement with all the revisions I had to make tonight), and I'll carefully fit the aft armor to it tomorrow once that's set.  Tomorrow's project will be to start working on the spacer armor to go between the gun decks, and to finish filling in the dorsal armor between the plates beneath the bridge.
« Last Edit: April 23, 2013, 05:12:06 AM by Armiger84 »
My modelling blog:  http://armiger84.blogspot.com

Offline Blindhorizon

  • Full Member
  • *
  • Posts: 318
Re: [BFG] Armiger84's Drydock
« Reply #6 on: April 23, 2013, 09:38:18 AM »
I think that backside looks a lot better, way bulkier compared to the other one. The edges not matching are just a matter of fiddling with it, i think you have your fast battleship. Well done sir.

Blind-

Offline Armiger84

  • Active Member
  • *
  • Posts: 131
    • Loc: Boston, MA
    • De Bellis Futuris
Re: [BFG] Armiger84's Drydock
« Reply #7 on: April 24, 2013, 10:46:32 PM »
Quick update, because we're headed out to dinner real soon, but I got some styrene work done last night and after work today.  I got the four armor spacers in for the upper gun decks, and built up the central spine in three stepped layers.  The square protrustions over that central spacer are meant for the gunnery/secondary bridge, and I put in another antenna port where the gun decks meet the aft armor.


What's left:
1) I need to put the trim on the armor spacers.  It's going to match the design on the stern armor.  The prow armor spacers are going to mount a pair of flat disks for me to paint on Legion heraldry (any guesses who I'm gifting this beast to?).  I'm also probably going to continue the trapezoidal sections from the gun decks along the armor plates too.
2) I need to use greenstuff to fill in that final hull gap in the stern, beneath where the bridge is going.  Shouldn't take too long, and it can be flat given all the detail that'll be going over it.
3) I need to finish assembling the primary bridge (it's 80% done), and attach antennas/sensors, etc.  I may also try sculpting the Legion heraldry on in greenstuff too.
My modelling blog:  http://armiger84.blogspot.com

Offline Armiger84

  • Active Member
  • *
  • Posts: 131
    • Loc: Boston, MA
    • De Bellis Futuris
Re: [BFG] Armiger84's Drydock
« Reply #8 on: April 27, 2013, 02:12:14 AM »
You know, I'm really starting to question my sanity here...

Tonight's project:  finish the other three of these:


Greenstuff work's been put off until I finish installing the flank armor plates so I can fill gaps on them while I'm at it.  For reference, those are hand-cut .5mm strips of styrene I'm using for the framing work.  I'm probably frying brain cells with all the super glue fumes I'm trying not to breathe in.  Beginning to really appreciate the advantages of CAD software when building miniatures.

I scrapped the idea of mounting medallions on a pair of the armor plates to paint heraldry onto.  My options are either too large to display any of the detailwork I'm currently applying, or too small for me to be able to paint anything realistic on.  Instead, I'm now looking at the prow and considering putting a figurehead on the dorsal side, possibly replacing some of those tiny turrets if need be.
« Last Edit: April 27, 2013, 02:20:08 AM by Armiger84 »
My modelling blog:  http://armiger84.blogspot.com

Offline Armiger84

  • Active Member
  • *
  • Posts: 131
    • Loc: Boston, MA
    • De Bellis Futuris
Re: [BFG] Armiger84's Drydock
« Reply #9 on: April 30, 2013, 01:33:48 AM »
Well, I got the news, and checked the site myself.  Not happy to hear what's happening to the Specialist Games lines, and I can only say that I wish I'd started rebuilding my fleets sooner.

(On that note, if anyone has a Repulsive-class or two that they're willing to part with, I'll probably be putting up a post in the trade section soonish)

Over the weekend I managed to add the row of 5 antennae to the bottom of the battleship.  For this I cut up three of those T-shaped chaos antenna arrays for their pairs of long arms; gave the lower antenna ridge a little body and depth.  other than that I finished up most of the greenstuff work.  I still need to apply some liquid greenstuff to the scratchbuilt gun deck armor panels, and build the figurehead.  I'm thinking of going Night Lords, but I'm a little apprehensive about trying to sculpt a pair of bat wings.  The finishing touch will be adding some horizontal antennae aft of the bridge, and then it'll be time to put some paint on her.


Oh, I also installed a magnetic adapter I picked up from Rattlehead Games (http://www.rattleheadgames.com/catalog/WithHostileIntent-MagneticAdapterSystemProducts.html in case you're curious).  They weren't hard to install on a plastic cruiser, although I did have to widen the hole on the cruiser to accept the mounting plug on the ship-side adapter.  I know it looks a little wonky on the plastic flying stand, but it's all going to be painted black soon anyhow, and I'm hoping it'll disappear visually at that point anyway.   I can't possibly count the times I've snapped flight stems, so I'm trying something a little different this time around, starting with my larger capital ships.  The hope is that by storing the ship separately from the base in an army case I'll be able to keep the ship more secure and I'll be less likely to break ship parts or the flying stem.

If you want, I can give some close-up shots of the adapter array, and/or put together a minor review on the adapters.  The assembly of the receiver end has me a little antsy, but it'll hold a plastic vessel no problem whatsoever.  A little concerned about a full pewter battleship though, so I'll try it out next on a Battle Barge kit I have waiting in the wings and review the adapter set at that point.
My modelling blog:  http://armiger84.blogspot.com

Offline Blindhorizon

  • Full Member
  • *
  • Posts: 318
Re: [BFG] Armiger84's Drydock
« Reply #10 on: April 30, 2013, 06:54:10 AM »
That ship looks amazing man well done, now get some paint on it!

Offline afterimagedan

  • Full Member
  • *
  • Posts: 1902
    • Loc: Chicago IL, USA
Re: [BFG] Armiger84's Drydock
« Reply #11 on: April 30, 2013, 03:42:24 PM »
Question: the smaller lines of plasticard that make the pieces in between the weapon batteries; are those precut? If so, what size?

Offline Armiger84

  • Active Member
  • *
  • Posts: 131
    • Loc: Boston, MA
    • De Bellis Futuris
[BFG] Armiger84's Drydock
« Reply #12 on: April 30, 2013, 06:34:58 PM »
@ blindhorizon
Thanks! Almost there.  There's a few more things I want to tidy up before I paint her... and work moved to heavy overtime this week, so progress might be slow.

@afterimagedan
No, they're not, well, sorta.  Years and years back I picked up a sheet of styrene 5" x 10" x .5mm thick I think it was originally, that had lightly scored lines on one side every .5mm. I've been using it for fine trim detail for a while now, I just run metal ruler & a scalpel along the scoring to cut off the width I need and then section it down further.  I should probably just pick up some squared .5mm x .5mm rods from Plastruct (and some .5mm x 1mm for true scaled marine shoulder pad trim, but that's another story...), but I'm working through what I have for now.  Glueing those into place was a pain and they're not perfect, but expedience won out over perfectionism after about half an hour of trying to line stuff up.

Here's a more in-depth explanation, and I'll try to add a few photos later if I have the time to replicate what I did:

Chaos Armor Spacers:

1cm x 1cm x 1mm square plastic plate
About 8 cm of .5mm x .5mm squared plastic rod/strip

1) Glue the squared plate into place before adding detail to it. I encourage you to glue down the aft gun decks first, then a spacer square, then a gun deck, then the last spacer. If you need to resize anything, shrinking the foremost armor plate won't look weird.

2) Start the trim by attaching the side pieces (the ones that abut the gun batteries) first. I moved the rod into position, glued it down, then after it dried cut it to fit flush with the square plate.

3) add the strip that abuts the ship's spine, then the outer edge. I test-fitted them a few times before attaching. Done at this stage, you can either set the rod flush with the ship's spine or have it match the gun batteries' lines, whichever you prefer.

4) I added a .5mm x .5mm x 1cm strip under the edge of the armor plate to bring it down to the depth of the chaos cruiser gun & lance battery plates, and centered a vertical dividing strip on the armor plate at this stage too.

5) once those secured, I cut down the interior detail bracing pieces. This was, for me, NOT an exact science at this stage, which I sort of regret. 3-4mm feels about right for the "trunk" piece of each "Y" shape, and for the upper brace.  I encourage you to experiment and not to take those numbers as gospel.

6) Once everything's secured, I green-stuffed any gaps and put a THIN layer over the outer edge of the plate, smother with a clay shaper, and I'll probably sand them very lightly tonight to make sure they're flat.

Hope that helps walk you through the process if you're thinking about replicating it!  I'll try to add some photos later when I get the chance.
« Last Edit: April 30, 2013, 06:52:11 PM by Armiger84 »
My modelling blog:  http://armiger84.blogspot.com

Offline Armiger84

  • Active Member
  • *
  • Posts: 131
    • Loc: Boston, MA
    • De Bellis Futuris
Re: [BFG] Armiger84's Drydock
« Reply #13 on: May 01, 2013, 05:29:16 AM »
Every time I go to post something in the "What's still available in the GW storefront" threads, I end up writing a longer and longer call to arms speech.  You guys don't need that (at least not in that space).  We're all here because we enjoy these games regardless of whether or not GW is supporting them.  Heck, I just got back into BFG and Epic Armageddon after years of my collection languishing in storage, and I'm not throwing in the towel now.

In the long term, I plan on building a chaos fleet to eclipse my original chaos fleet (although I never lost that one, it's just... well, I've come a long way in terms of painting since then, and unfortunately I gloss-coated those guys when I finished them, not sure I can strip that), and I've got a dream Imperial fleet combining a few different themes to finish too... and working on the Blasphemer I realize that with more patience and practice, I could probably turn out a decent alternative hull for a chaos cruiser that could carry the theme without treading too sharply on GW's IP toes (here's hoping).

Yeah, I realize this is a big post with no new battleship pictures, but in my defense it's half past midnight here on the east coast and I only got home 4 hours ago so... tomorrow.  I promise.  I'm just not looking forward to the intensive knife-work I have planned to fit antennas onto the port & starboard aft armor.  Probably something I shouldn't try doing on the 5 crummy hours of sleep I got last night...
My modelling blog:  http://armiger84.blogspot.com

Offline RaptorEvolved

  • Active Member
  • *
  • Posts: 111
  • Into the fires of battle, unto the anvil of war!
    • Loc: Chicago
Re: [BFG] Armiger84's Drydock
« Reply #14 on: May 01, 2013, 06:06:27 AM »
coll can' wait to see stuff
If I do kill you, it'll be from the front, and you'll be armed.
-Malcolm Reynolds